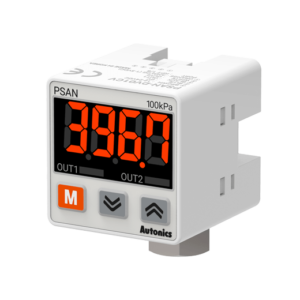
Pressure is an expression of force exerted on a surface per unit area. We commonly measure the pressure of liquids, air, and other gases, amongst other things. The standard unit for pressure is the “Pascal”. This is equivalent to one “Newton per meter squared”. A pressure sensor simply monitors this pressure and can display it in one of the several units known around the world. This is commonly the “Pascal”, “Bar”, and “PSI” (Pounds per Square Inch) in the United States. In a nutshell, a pressure sensor converts the pressure to a small electrical signal that is transmitted and displayed. These are also commonly called pressure transmitters because of this. Two common signals that are used are “4 to 20” milliamps signal and “0 to 5” Volts signal.
Most pressure sensors work using the piezoelectric effect. This is when a material creates an electric charge in response to stress. This stress is usually pressure but can be twisting, bending, or vibrations. The pressure sensor detects the pressure and can determine the amount of pressure by measuring the electric charge. Pressure sensors need to be calibrated so it knows what voltage or milliamp (mA) signal corresponds to what pressure.
There are three common types that we use in the industry: “Gauge Pressure”, “Absolute Pressure” and “Differential pressure”.

The humidity sensor is a device that senses, measures, and reports the relative humidity (RH) of air or determines the amount of water vapor present in gas mixture (air) or pure gas. Humidity sensing is related to a water adsorption and desorption process. Humidity sensors are used for monitoring industrial as well agricultural products. Humidity sensors are used in equipment such as incubators, sterilizers, and pharmaceutical processing equipment.
An overview of the BME280 sensor

BME280 is a digital relative Humidity, barometric pressure and temperature sensor specially developed for mobile applications and wearables where size and low power consumption are key design parameters. The unit combines high linearity and high accuracy sensors and is perfectly feasible for low current consumption, long-term stability, and high EMC robustness. The humidity sensor offers an extremely fast response time and supports performance requirements for emerging applications such as context awareness and high accuracy over a wide temperature range. This sensor provides both SPI and I2C interfaces.
Specification
Application
- Output type: Digital – I2C or SPI
- Pressure range: 300 hpa to 1100 hpa
- Humidity range: 0 to 100 %RH
- Temperature Accuracy: ±0.5°C to Offset of ±3.0%FS
- Temperature Resolution: 0.01°C
For more specifications, please refer to datasheet
- Context awareness
- Fitness monitoring
- Home automation
- Internet of things
BME280 module Key Features
- User-selectable module power supply voltage between 1V8 and 3V3
- User-selectable module I/O logic voltage between 1V8 and 3V3
- User-selectable interface protocol (I2C or SPI)
- User-selectable I2C address
- On Board, ON/OFF LED indicator
- GebraBit Pin Compatible with GEBRABUS
- It can be used as a daughter board of GebraBit MCU Modules
- Featuring Castellated pad (Assembled as SMD Part)
- Separatable screw parts to reduce the size of the board
GebraBit BME280 module

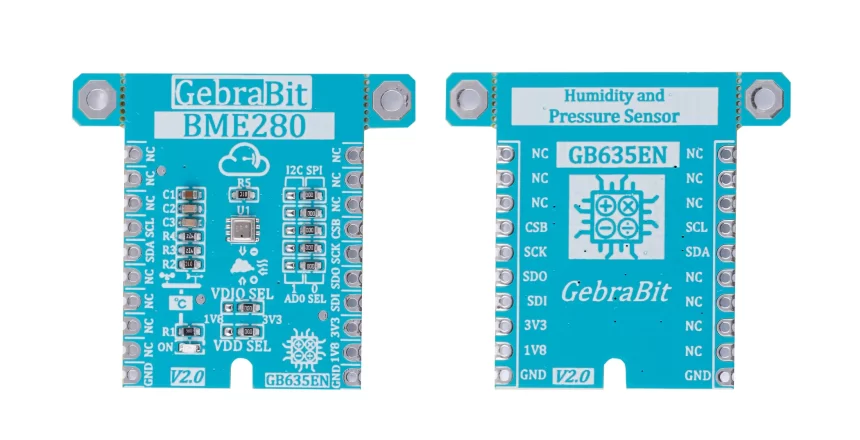
GebraBit BME280 is a digital relative humidity, barometric pressure, and ambient temperature measurement Module.
GebraBit BME280 module can operate with “1V8” or “3V3” supply Voltages by Considered “VDD SEL” jumper selector. Also there is another jumper named “VDIO SEL “, which is regarded to select logic level voltage of module I/O pins between “1V8” or “3V3”. This feature helps to use a wide range of microcontrollers for interfacing with this module.
User can interface with GebraBit BME280 by either I2C or SPI protocol. This is achieved by dedicated four jumper selectors on the top right of the GebraBit BME280 module.
After the explanations mentioned above , due to LGA package and lack of access to sensor pins, you have noticed that, the user needs a starter circuit and driver for the hardware development and of course the software development of the BME280 sensor. For the convenience of users, this work has been done by implementing the BME280 sensor circuit and providing access to the communication and power supply signal pins, with the ability to select the I2C or SPI communication protocol and the operation voltage and logic level of the communication protocols.

It is enough to put the GebraBit BME280 module in the BreadBoard, then by applying the proper voltage and choosing the I2C or SPI communication protocol, set up the GebraBit BME280 module with any of Arduino, Raspberry Pi, Discovery board, and especially we recommend using GebraBit microcontroller development modules( GebraBit STM32F303 or GebraBit ATMEGA32 module) then receiving the data.

The reason for our recommendation when setting up the GebraBit BME280 module with GebraBit microcontroller development modules (such as GebraBit STM32F303 or GebraBit ATMEGA32), is the presence of an internal 3V3 regulator on these modules and the compatibility of the pin order of all GebraBit modules together (GEBRABUS standard), it’s enough to Put the BME280 in the corresponding socket as shown in the above picture and develop the desired sensor module without the need for wiring.
Introduction of module sections

BME280 sensor
BME280 is the main IC of the following module which is responsible for monitoring humidity, temperature and pressure. It is located in the center of the module and its circuit is designed.

Communication protocol selection jumpers
If the 0R resistors of all Jumper Selectors are to the left side, the I2C protocol is selected.

If the 0R resistors of all Jumper Selectors are to the right side, the SPI protocol is selected.

AD0 SEL jumper
If the I2C protocol is selected, the state of AD0 SEL jumper, determines the I2C address of the sensor (0 => 0x76 or 1 => 0x77).

By default the 0R resistor is set to 0 and the address 0x76 is selected.
VDIO SEL jumper
According to the state of 0R resistance of this jumper, the logic level of digital communication (I2C or SPI) of the sensor is selected between 1V8 and 3V3.

The digital communication logic level (I2C or SPI) of the sensor is selected 3V3 (By default).
VDD SEL jumper
According to the state of 0R resistance of this jumper, the main voltage of power supply the sensor is selected between 1V8 and 3V3.

By default the main sensor power supply voltage is 3V3.
LED power supply
According to the state of the VDD SEL jumper and applying voltage to the module by the corresponding pin, the LED of the module will be lit.

GebraBit BME280 Module pins

Supply pins
- 3V3 and 1V8: These pins can supply the sensor main power supply and the logic level of the sensor digital connection (I2C or SPI) according to the state of the VDDSEL and VDIOSEL selector jumpers.
- GND: This is the common ground pin for power and logic level of the sensor.

I2C pins
By using the on-board embedded Jumper selectors, you can choose the type of module communication . If the 0R resistors of all the Jumper Selectors are to the left side, the I2C protocol is selected. AD0 SEL jumper status is the I2C address of the sensor (0x76 or 0x77 ).
- SDA: This pin is the I2C communication data pin, which is connected to the corresponding data pin in the microcontroller (processor). According to the state of the VDIOSEL jumper, you can use the logic level with a voltage of 1V8 or 3V3.This pin is pulled up with a resistor.
- SCL: This pin is the I2C communication clock pin, which is connected to the corresponding clock pin in the microcontroller (processor). Depending on the state of the VDIOSEL jumper, you can use the logic level with a voltage of 1V8 or 3V3. This pin is pulled up with a resistor.

SPI pins
The type of communication with the module can be selected by using the on-board embedded Selector Jumpers. If the 0R resistors of all the Selector Jumpers are to the right side, the SPI protocol has been selected. The state of the AD0 SEL jumper has no effect in this case.
- SDI (MOSI): This pin is used to send data from the microcontroller (processor) to the module (sensor). The abbreviation of this pin is derived from the Latin phrase Serial Data In / Microcontroller Out Sensor In.
- SDO (MISO): This pin is used to send data from the module (sensor) to the microcontroller (processor). The abbreviation of this pin is derived from the Latin phrase Serial Data Out / Microcontroller In Sensor Out.
- SCK: This pin is the clock pin for SPI communication, which is considered as an input for the sensor and is connected to the corresponding clock pin in the microcontroller (processor).
- CS: This pin is the Chip Select pin for SPI communication with the module (sensor), which is selected by applying LOW voltage (0V), the module (sensor) for SPI communication. This pin is input type for the sensor.

If you want to use several GebraBit BME280 modules at the same time, it is enough to connect the SDO, SDI, SCK pins of all modules and the microcontroller (processor) and assign a unique pin to each CS.
Connect to the processor

I2C connection with GebraBit STM32F303
First, make sure that the I2C protocol is selected by using the on-board jumpers, then for I2C connection of GebraBit BME280 and GebraBit STM32F303 microcontroller module, after defining SDA and SCL on pins PB9 and PB8 (for convenience in STMCUBEMX), follow the below steps:
- Connect the 3V3 pin of the BME280 module to the 3V3 output pin of the microcontroller module. (Red wire)
- Connect the GND pin of the BME280 module to the GND pin of the microcontroller module (Black wire).
- Connect the SCL pin of the BME280 module to the PB8 pin of the microcontroller (SCL) module (Blue wire).
- Connect the SDA pin of the BME280 module to the PB9 pin of the microcontroller (SDA) module. (Yellow wire)
You can see how to connect the above mentioned steps in this picture:

Note: Considering that the PA14 pin of the GebraBit STM32F303 microcontroller module is used to program the microcontroller, I2C setting on the PA14 and PA15 pins is impossible in this version, so in this version for I2C connection with the GebraBit STM32F303 microcontroller module, GebraBit BME280 module cannot be placed on it as Pin to Pin. To make a more convenient connection between the two modules, you can select the SPI protocol by using the on-board jumpers and then place the GebraBit BME280 module as Pin to Pin on the GebraBit STM32F303 module.
SPI connection with GebraBit STM32F303
First, make sure that the SPI protocol is selected by using the on-board jumpers, then for connecting GebraBit BME280 module to the GebraBit STM32F303 microcontroller module with SPI protocol, after defining SDI, SDO, SCK, and CS on pins PB5, PB4, PB3, and PC13 ( For ease of work in STMCUBEMX) place the GebraBit BME280 module Pin to Pin on the GebraBit STM32F303 module easily.
Here, for better understanding, the separate connection of these two modules is shown:

SPI or I2C connection with GebraBit ATMEGA32A
Considering that the SPI and I2C pins of the ATMEGA32A microcontroller are based on the GEBRABUS standard and correspond to the SPI and I2C pins of other GEBRABIT modules, the GebraBit BME280 module can be placed pin to pin on the GebraBit ATMEGA32A module and communicate with the GebraBit BME280 module via SPI or I2C by changing the state of the protocol selection jumper resistors Here, for better understanding, the separate connection of these two modules is shown:


Note: If you are using GebraBit microcontroller modules, note that the power jumper selectors of the GebraBit BME280 are set to 3V3 so that you can easily power-on the GebraBit BME280 module by getting the 3V3 voltage from the microcontroller module.
I2C Connection with ARDUINO UNO
First, make sure that the I2C protocol is selected by using the on-board jumpers, then follow the below steps to connect the GebraBit BME280 module to the ARDUINO UNO via I2C :
- Connect the 3V3 pin of the BME280 module to the 3V3 output pin of the ARDUINO UNO board. (Red wire)
- Connect the GND pin of the BME280 module to the GND pin of the ARDUINO UNO board (Black wire).
- Connect the SCL pin of the BME280 module to the A5 pin of the ARDUINO UNO board (SCL). (Blue wire)
- Connect the SDA pin of the BME280 module to the A4 pin of the ARDUINO UNO board (SDA). (Orange wire)
You can see how to connect the above mentioned steps in this picture:

SPI Connection with ARDUINO UNO
First, make sure the SPI protocol is selected using the on-board jumpers, then follow the below steps to connect the GebraBit BME280 module to the ARDUINO UNO via SPI:
- Connect the 3V3 pin of the BME280 module to the 3V3 output pin of the ARDUINO UNO board. (Red wire)
- Connect the GND pin of the BME280 module to the GND pin of the ARDUINO UNO board (black wire).
- Connect the SDI pin of the BME280 module to the D11 pin of the ARDUINO UNO board (SDI). (Yellow wire)
- Connect the SDO pin of the BME280 module to the D12 pin of the ARDUINO UNO board (SDO). (Purple wire)
- Connect the SCK pin of the BME280 module to the D13 pin of the ARDUINO UNO board (SCK). (Orange wire)
- Connect the CS pin of the BME280 module to the D10 pin of the ARDUINO UNO board (SS). (Blue wire)
You can see how to connect the above mentioned steps in this picture:


