GebraBit

GebraBit Rain Sensor Module Overview

متن سربرگ خود را وارد کنید

rain both

GebraBit Rain Sensor Module Overview

  1. Home
  2. »
  3. Blog
  4. »
  5. GebraBit Rain Sensor Module Overview

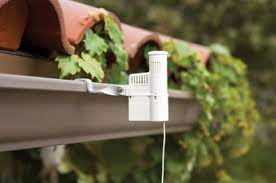
Raindrop Sensor is a tool used for sensing rain. It consists of two modules, a rain board and a control module.

The rain board is made out of multiple exposed log conductive plates arranged in a grid format. When rain falls on top of the sensor the resistivity of the conductive plate changes, and by measuring the changes in the resistance, we can determine the intensity of the rainfall. The more intense the rainfall the lower the resistance.  

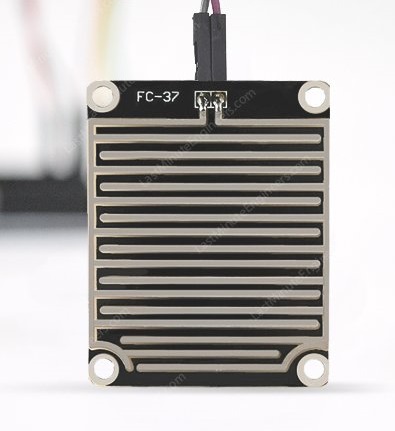
The control module, compares the analog value, and converts it to a digital value.

It is used in automation tasks like windshield wipers, automatic window closing in case of thunderstorm or adjust room temperature, in agriculture sector to plan the watering of the crops etc.

GebraBit Rain sensor module

GEBRABIT Rain Sensor with a series of exposed copper traces together acts as a variable resistor (just like a potentiometer) which resistance varies according to the amount of water on its surface. This sensor is a resistive dipole based only on moisture, showing the resistance. For example, it shows more resistance when it is dry and less resistance when wet. Users can adjust the sensitivity with On Board Potentiometer.

It is worth noting that the GebraBit Rain Sensor module is designed in such a way that users can separate the control part and the resistive part of the module if needed, and communicate between these two parts by using two Right Angel header pins and a wire.

To access the output data, it is enough to put the GebraBit Rain Sensor module in the BreadBoard, then by applying the proper voltage set up the GebraBit Rain Sensor module with any of Arduino, Raspberry Pi, Discovery board, and especially we recommend using GebraBit microcontroller development modules (GebraBit STM32F303 or GebraBit ATMEGA32 module) then receive the data. 

The reason for our recommendation when setting up the GebraBit Rain Sensor  module with GebraBit microcontroller development modules (such as GebraBit STM32F303 or GebraBit ATMEGA32), is the presence of a 3V3 regulator and the compatibility of the pin order of all GebraBit modules together (GEBRABUS standard), it’s enough to Put the GebraBit Rain Sensor module in the corresponding socket and develop the desired sensor module without the need for wiring.   

GebraBit Rain sensor module Key Features

  • Selectable module power supply and voltage between3V3 and 5V
  • On Board, ON/OFF LED indicator
  • Board LED indicator for OUTPUT Signal
  • GEBRABIT Pin Compatible with GEBRABUS
  • GEBRABIT small package
  • It can be used as a daughter board of GEBRABIT MCU Modules
  • Featuring Castellated pad (Assembled as SMD Part)
  • Separatable screw parts to reduce the size of the board

Introduction of module sections

Rain board

The rain detection section of the GebraBit Rain Sensor module is located on the top of the module and when the rain drops hit this section, its resistance changes, the more intense the rain, the lower the resistance.

LM393 convertor

An LM393 op-amp is used in the GebraBit Rain Sensor module, and the main task of this op-amp is to convert the input analog signal into a digital signal.

Sensitivity potentiometer

In the GebraBit Rain Sensor, a potentiometer is used to determine the sensor sensitivity threshold.

OUT LED

The OUT LED lights up when there are no raindrops on the rain detection board and the DO output is high.

VCC SEL jumper

According to the state of 0R resistance of this jumper, the sensor supply voltage is selected between 5V and 3V3.

Power LED

According to the status of the module power selector jumper and by applying voltage to the module through the corresponding pin, the LED of the module turns on.

GebraBit Rain sensor Module pins

Supply pins

  • 3V3 and 5V: These pins can supply the power supply of the sensor circuit according to the state of the power voltage selector jumper.
  • GND: This is the ground pin for powering the sensor.

Output pins

  • AO: This pin is used to receive the analog output of the module and outputs the amount of water on the rain detection screen as an analog voltage.
  • DO: This pin is used to receive the digital output of the module. When there is no rain drop on the rain detection board, this pin is in High state and when a small amount of water is detected, this pin is in Low state, with clear When the water drops off the screen, the DO pin goes back to High.

Connection with GebraBit STM32F303

Due to the compatibility of the pin order of GebraBit modules with each other (GEBRABUS standard), to start the GebraBit Rain sensor module with GebraBit STM32F303 microcontroller module, it is enough to easily place the GebraBit Rain sensor module as pin to pin on the GebraBit STM32F303 module and start the module by applying voltage. Here, for better understanding, the separate connection of these two modules is shown:

Connection with GebraBit ATMEGA32A

Due to the compatibility of the pin order of GebraBit modules with each other (GEBRABUS standard), to start the GebraBit Rain sensor module with the GebraBit ATMEGA32A microcontroller module, it is enough to easily place the GebraBit Rain sensor module as pin to pin on the GebraBit ATMEGA32A module and start the module by applying voltage. Here, for better understanding, the separate connection of these two modules is shown:

Note: If you use GebraBit microcontroller modules, make sure that the VCC SEL selector jumper of GebraBit Rain sensor module is set to “3V3” so that you can easily get “3V3” voltage from the microcontroller module.

Connection with ARDUINO UNO

Follow the steps below to connect the GebraBit Rain sensor module to ARDUINO UNO:

  • Connect the “5V” pin of the Rain sensor module to the “5V” pin of the ARDUINO UNO board output (red wire).
  • Connect the “GND” pin of the Rain sensor module to the “GND” pin of the ARDUINO UNO board. (Black wire)
  • Connect the “DO” pin of the Rain sensor module to one of the ARDUINO UNO board digital pins (Blue wire).
  • Connect the “AO” pin of the Rain sensor module to one of the ARDUINO UNO board analog pins (orange wire).

How to connect the above mentioned steps can be seen in this picture:

این مقاله را با دوستانتان به اشتراک بگذارید!

Leave a Reply

Your email address will not be published. Required fields are marked *

Shopping cart
Start typing to see posts you are looking for.

Sign in

No account yet?