GebraBit

GebraBit Capacitive Soil Moisture Module Overview

متن سربرگ خود را وارد کنید

Capacitive both

GebraBit Capacitive Soil Moisture Module Overview

  1. Home
  2. »
  3. Blog
  4. »
  5. GebraBit Capacitive Soil Moisture Module Overview

As you know, a capacitor consists of 3 parts. A positive plate, a negative plate and the distance between the plates (dielectric). Capacitors have different physical forms, but they all have two metal plates and a dielectric.

A capacitive soil moisture sensor works by measuring the change in capacitance. In simple terms, capacitance measures the amount of electrical charge that can be stored across an electrical potential. A capacitive soil moisture sensor is commonly built with a positive and negative plate, which are separated by a dielectric medium in the middle.

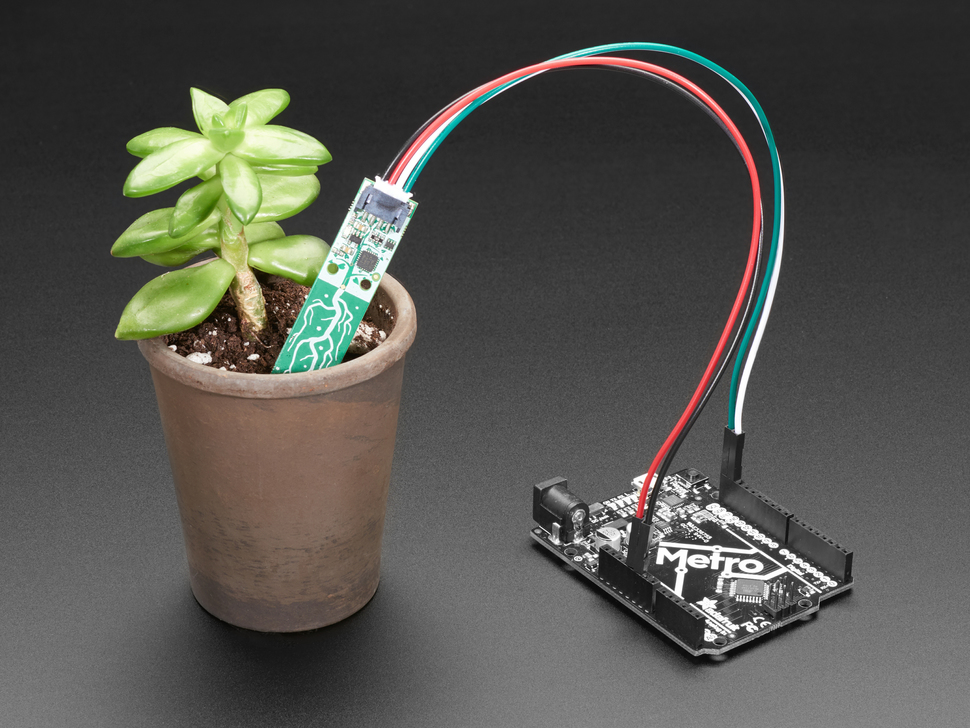
In this case, the soil is the dielectric medium and its capacitance changes with moisture content. By pairing the sensor with a timer circuit, we obtain an analog voltage that can be read with an Arduino board. This voltage in turn has a direct relationship with the soil moisture content.

GebraBit Capacitive Soil Moisture sensor module Key Features

  • User-selectable module power supply voltage between 3V3 and 5V
  • On Board, ON/OFF LED indicator
  • GEBRABIT Pin Compatible with GEBRABUS
  • It can be used as a daughter board of GEBRABIT MCU Modules
  • Featuring Castellated pad (Assembled as SMD Part)
  • Separatable screw parts to reduce the size of the board
  • Package: 36.29mm x 107.72mm

GebraBit Capacitive Soil Moisture sensor module

GEBRABIT Capacitive Soil Moisture module determines the amount of soil moisture by measuring changes in capacitance to determine the water content of the soil. GEBRABIT Capacitive Soil Moisture has an analog and digital output capable of using 3V3 and 5V Supply Voltages that users can easily select with Considered on board jumper select. This feature helps to use a wide range of microcontrollers for interfacing with this module.

To access the output data, it is enough to put the GebraBit Capacitive Soil Moisture module in the BreadBoard, then by applying the proper voltage set up the GebraBit Capacitive Soil Moisture module with any of Arduino, Raspberry Pi, Discovery board, and especially we recommend using GebraBit microcontroller development modules (GebraBit STM32F303 or GebraBit ATMEGA32 module) then receive the data.       

The reason for our recommendation when setting up the GebraBit Capacitive Soil Moisture module with GebraBit microcontroller development modules (such as GebraBit STM32F303 or GebraBit ATMEGA32), is the presence of a 3V3 regulator and the compatibility of the pin order of all GebraBit modules together (GEBRABUS standard), it’s enough to Put the GebraBit Capacitive Soil Moisture module in the corresponding socket as shown in the above picture and develop the desired sensor module without the need for wiring.     

Introduction of module sections

Capacitive soil moisture sensor

The 6cm long GebraBit Capacitive Soil Moisture module’s moisture detection capacitive part is located on the top of the module. By placing this part in the soil, with the change in the amount of water in the soil (i.e. soil moisture), the concentration of its ions also changes, as a result, by changing the dielectric of this sensor, the sensor capacitance also changes. There is an inverse ratio between the output value of the sensor and soil moisture.

Note: Note that the capacitive part should not be placed in the soil more than the line marked as “warning line” in the above pic, so that the rest of the sensor components are not damaged.

TL555 timer

In the GebraBit Capacitive Soil Moisture module, a 555 timer-based circuit is used to measure the capacity of the sensor capacitor, which produces a voltage that has a direct ratio with the capacitor placed in the soil.

VCC SEL jumper

According to the state of 0R resistance of this jumper, the main voltage of sensor power supply is selected between “5V” and “3V3”.

Power LED

According to the state of the VCC SEL jumper and by applying voltage to the module through the corresponding pin, this LED will be lit.

GebraBit Capacitive Soil Moisture Module pins

Supply pins

  • 5V and 3V3: These pins can supply the sensor main power according to the state of the VCC SEL selector jumper.
  • GND: This is the ground pin for powering the sensor.

Output pins

  • AO: This pin is the module analog output pin which is used to receive the amount of soil moisture as an analog output.

Connect to the processor

Connection with GebraBit STM32F303

Due to the compatibility of the pin order of GebraBit modules with each other (GEBRABUS standard), to start the GebraBit Capacitive Soil Moisture module with GebraBit STM32F303 microcontroller module, it is enough to easily place the GebraBit Capacitive Soil Moisture module as pin to pin on the GebraBit STM32F303 module and start the module by applying voltage. Here, for better understanding, the separate connection of these two modules is shown:

Connection with GebraBit ATMEGA32A

Due to the compatibility of the pin order of GebraBit modules with each other (GEBRABUS standard), to start the GebraBit Capacitive Soil Moisture module with the GebraBit ATMEGA32A microcontroller module, it is enough to easily place the GebraBit Capacitive Soil Moisture module as pin to pin on the GebraBit ATMEGA32A module and start the module by applying voltage. Here, for better understanding, the separate connection of these two modules is shown:

Note: If you use GebraBit microcontroller modules, make sure that the VCC SEL selector jumper of GebraBit Capacitive Soil Moisture module is set to “3V3” so that you can easily get “3V3” voltage from the microcontroller module.

Connection with ARDUINO UNO

Follow the steps below to connect the GebraBit Capacitive Soil Moisture module to ARDUINO UNO:

  • Connect the “5V” pin of the Capacitive Soil Moisture module to the “5V” pin of the ARDUINO UNO board output (red wire).
  • Connect the “GND” pin of the Capacitive Soil Moisture module to the “GND” pin of the ARDUINO UNO board. (Black wire)
  • Connect the “AO” pin of the Capacitive Soil Moisture module to one of the ARDUINO UNO board analog pins (orange wire).

How to connect the above mentioned steps can be seen in this picture:

این مقاله را با دوستانتان به اشتراک بگذارید!

Leave a Reply

Your email address will not be published. Required fields are marked *

Shopping cart
Start typing to see posts you are looking for.

Sign in

No account yet?