What's the purpose of this project?
The project aims to interface the ADS1191 sensor with Arduino for real-time ECG monitoring. Ideal for applications like portable health devices, fitness trackers, and medical research, it provides accurate physiological data to enable responsive and reliable health monitoring systems.
What are we going to learn in this tutorial?
In this tutorial, you’ll learn how to:
- Connect the ADS1191 sensor to Arduino and establish SPI communication.
- Configure and use an existing library to enable ECG data acquisition.
- Read and interpret physiological signals in real-time, understanding data for medical and fitness applications.
- Implement sensor-based projects for portable health monitoring, gaining practical skills for creating responsive systems based on ECG and respiration measurements.
This hands-on guide provides insights into sensor integration and real-time physiological data monitoring with Arduino.
What do we need to start this project?
As you probably know, we need some hardware and software to do this project. The titles of these hardware and software are provided to you in the table below and you can prepare/download by clicking on each of them and get ready to start.
|
Required hardware
|
Required software
|
|---|---|
|
Arduino UNO
|
|
|
Logic Level Converter
|
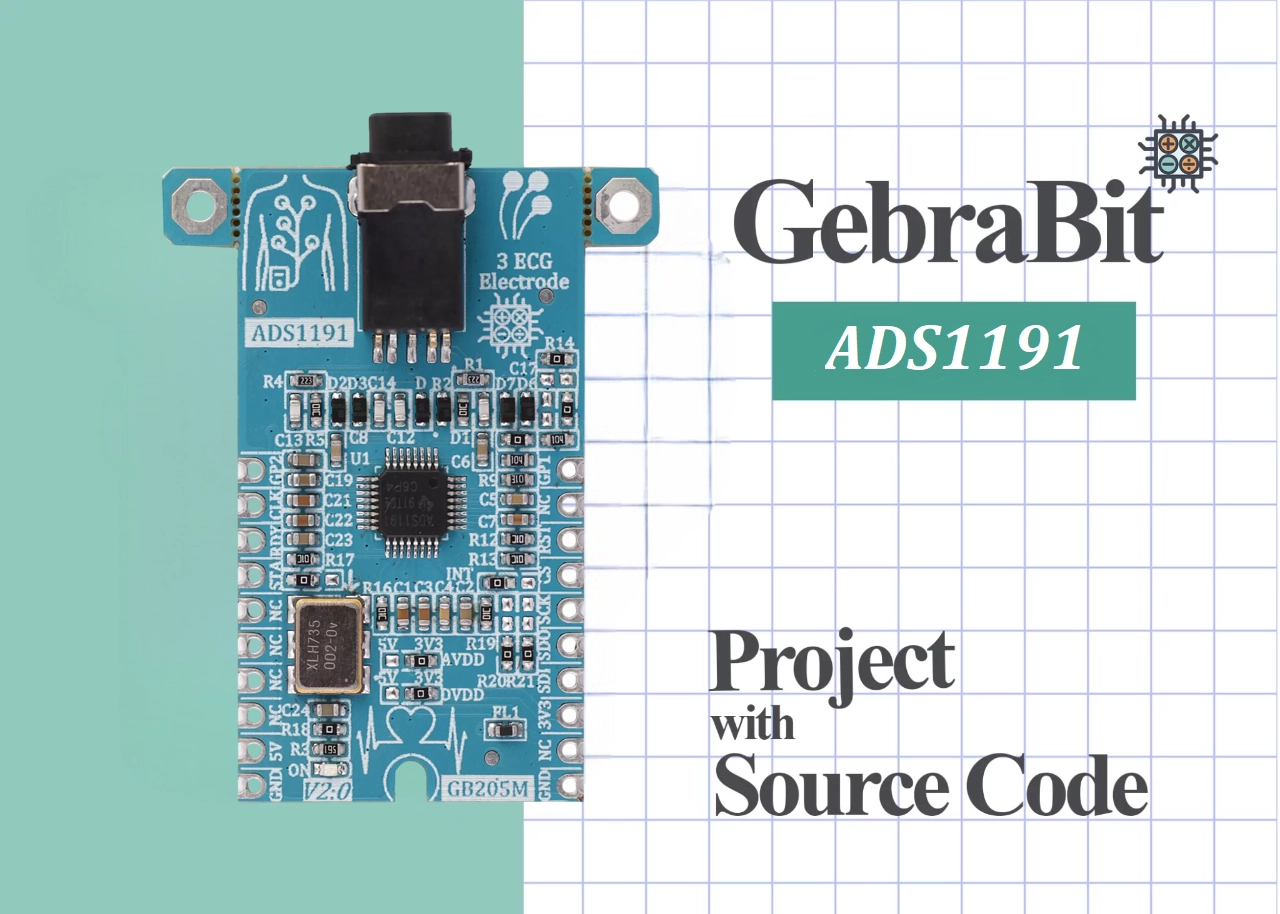
First as shown in the image below, we connect the GebraBit ADS1191 module to the Arduino UNO as follows:

Then download and add the GebraBit ADS1191 library to your Arduino IDE.
|
Arduino
|
ADS1191
|
Color
|
|---|---|---|
|
D11 (MOSI)
|
SDI
|
Gold
|
|
D12 (MISO)
|
SDO
|
Yellow
|
|
D13 (SCK)
|
SCK
|
Brown
|
|
D10 (SS)
|
CS
|
Gray
|
|
D7
|
RST
|
Green
|
|
D2
|
RDY
|
Purpule
|
|
A5
|
STA
|
Orange
|
|
3V3
|
3V3
|
Red
|
|
5V
|
NC
|
Blue
|
|
GND
|
GND
|
Black
|
The provided library and code are designed for the default jumper settings (as shown in the image above). If the jumper settings are changed, modifications to the code may be required based on the sensor’s datasheet and module schematic. Please note that changing the jumper settings can affect the functionality of the sample code available on the website.
After connecting the Arduino to the module using a Logic Level Converter, download the ADS1191 library and add it to the Arduino software.
|
Required Library
|
|---|
If you don’t know how to add GebraBit libraries to Arduino IDE, refer to the tutorial link below.
ECG Lead Connection
To connect the device to the body, a 3-lead ECG cable with a male headphone jack is used. In 3-lead ECG cables, the leads are color-coded as red, green, and yellow. The red lead is connected to the right arm, the yellow lead to the left arm, and the green lead to the right leg of the person.
By connecting the male headphone jack of the ECG cable to the corresponding socket on the module and properly attaching the leads, the module is activated, and heart rate monitoring is performed.
There are various methods for attaching these three leads to the body, and the method mentioned is just one of them. Before attaching the leads, be sure to clean the target area with alcohol. Dust, grease, or hair on the surface can reduce the quality of the signals received by the module and affect measurement accuracy.
ADS1292 library and driver
In addition to the modular design of various sensors and ICs, GebraBit tries to provide variety of structured and hardware-independent libraries in C language for the ease of users in setting up and developing software.
For this purpose, after preparing each GebraBit module, the users can refer to the “tutorial” section of the desired module and download the dedicated library, which contains the “ .h” and “ .cpp” file (Header and Source) and a sample training program under “GebraBit STM32F303”, “GebraBit ATMEGA32A” or “Arduino” development boards.
All the defined functions and structures in the library are commented in full detail and all the received parameters in the arguments of the functions and their return values, are briefly explained. Since the libraries are hardware independed, the user can easily add the library in any of their favorite compilers and develop it by desired microcontroller and development board.
Sample program in Arduino
After connecting the module to Arduino and adding the library to the IDE, go to the following path: File > Examples > GebraBit_ADS1191-2 > ECG_Plotter
Description of Sample file
					//  |ads119X pin label | Arduino Connection   |Pin Function      |
//  |----------------- |:--------------------:|-----------------:|
//  | VDD              | +3V3                 |  Supply voltage  |
//  | RST              | D7                   |  Reset           |
//  | STA              | A5                   |  Start Input     |
//  | RDY              | D2                   |  Data Ready Outpt|
//  | CS               | D10                  |  Chip Select     |
//  | SDI              | D11                  |  Slave In        |
//  | SDO              | D12                  |  Slave Out       |
//  | SCK              | D13                  |  Serial Clock    |
//  | GND              | Gnd                  |  Gnd             |
					#include "GebraBit_ADS1191-2.h"
#include "ecgAlgo1191-2.h"
#include <SPI.h>
const int ADS119X_DRDY_PIN = 2;
const int ADS119X_CS_PIN = 10;
const int ADS119X_START_PIN = A5;
const int ADS119X_PWDN_PIN = 7;
					    //To see the output of another channel on the plotter, change CH1Filterout to CHXFilterout, uncomment the specific channel number lines, and comment out the CH2 lines.
    Serial.println(CH1Filterout);
The Sample file code text:
					// ________________________________________________________________________________________________________
// Copyright (c) 2020 GebraBit Inc. All rights reserved.
//
// This software, related documentation and any modifications thereto (collectively �Software�) is subject
// to GebraBit and its licensors' intellectual property rights under U.S. and international copyright
// and other intellectual property rights laws.
//
// GebraBit and its licensors retain all intellectual property and proprietary rights in and to the Software
// and any use, reproduction, disclosure or distribution of the Software without an express license agreement
// from GebraBit is strictly prohibited.

// THE SOFTWARE IS PROVIDED "AS IS", WITHOUT WARRANTY OF ANY KIND, EXPRESS OR IMPLIED, INCLUDING BUT
// NOT LIMITED TO THE WARRANTIES OF MERCHANTABILITY, FITNESS FOR A PARTICULAR PURPOSE AND NON-INFRINGEMENT IN
// NO EVENT SHALL GebraBit BE LIABLE FOR ANY DIRECT, SPECIAL, INDIRECT, INCIDENTAL, OR CONSEQUENTIAL DAMAGES,
// OR ANY DAMAGES WHATSOEVER RESULTING FROM LOSS OF USE, DATA OR PROFITS, WHETHER IN AN ACTION OF CONTRACT,
// NEGLIGENCE OR OTHER TORTIOUS ACTION, ARISING OUT OF OR IN CONNECTION WITH THE USE OR PERFORMANCE
// OF THE SOFTWARE.
// @Author       	: Sepehr Azimi
// inspired by ADS1292R ProtoCentral source code
// ________________________________________________________________________________________________________
//
//  |ads119X pin label | Arduino Connection   |Pin Function      |
//  |----------------- |:--------------------:|-----------------:|
//  | VDD              | +3V3                 |  Supply voltage  |
//  | RST              | D7                   |  Reset           |
//  | STA              | A5                   |  Start Input     |
//  | RDY              | D2                   |  Data Ready Outpt|
//  | CS               | D10                  |  Chip Select     |
//  | SDI              | D11                  |  Slave In        |
//  | SDO              | D12                  |  Slave Out       |
//  | SCK              | D13                  |  Serial Clock    |
//  | GND              | Gnd                  |  Gnd             |
//
// ________________________________________________________________________________________________________


#include "GebraBit_ADS1191-2.h"
#include "ecgAlgo1191-2.h"
#include <SPI.h>

volatile uint8_t globalHeartRate = 0;
volatile uint8_t globalRespirationRate=0;

const int ADS119X_DRDY_PIN = 2;
const int ADS119X_CS_PIN = 10;
const int ADS119X_START_PIN = A5;
const int ADS119X_PWDN_PIN = 7;

int16_t CH1WaveBuff, CH1Filterout;
int16_t CH2WaveBuff, CH2Filterout;

ads119x ADS119X;
ecg_algorithm ECG_ALGORITHM;

void setup()
{
  delay(2000);

  SPI.begin();
  SPI.setBitOrder(MSBFIRST);
  //CPOL = 0, CPHA = 1
  SPI.setDataMode(SPI_MODE1);
  // Selecting 1Mhz clock for SPI
  SPI.setClockDivider(SPI_CLOCK_DIV16);

  pinMode(ADS119X_DRDY_PIN, INPUT);
  pinMode(ADS119X_CS_PIN, OUTPUT);
  pinMode(ADS119X_START_PIN, OUTPUT);
  pinMode(ADS119X_PWDN_PIN, OUTPUT);

  Serial.begin(57600);
  ADS119X.ads119xInit(ADS119X_CS_PIN,ADS119X_PWDN_PIN,ADS119X_START_PIN);
  Serial.println("Initiliziation is done");
}

void loop()
{
  ads119xOutputValues ecgValues;

  boolean ret = ADS119X.getads119xEcgSamples(ADS119X_DRDY_PIN,ADS119X_CS_PIN,&ecgValues);
  if (ret == true)
  {
    CH1WaveBuff = (int16_t)(ecgValues.sDaqVals[0]) ;
    CH2WaveBuff = (int16_t)(ecgValues.sDaqVals[1]) ;

    if(ecgValues.leadoffDetected == false)
    {

      ECG_ALGORITHM.ECG_ProcessCurrSample(&CH1WaveBuff, &CH1Filterout);   // filter out the line noise @40Hz cutoff 161 order
      ECG_ALGORITHM.QRS_Algorithm_Interface(CH1Filterout,&globalHeartRate); // calculate
      // Uncomment for CH2
      //ECG_ALGORITHM.ECG_ProcessCurrSample(&CH2WaveBuff, &CH2Filterout);   // filter out the line noise @40Hz cutoff 161 order
      //ECG_ALGORITHM.QRS_Algorithm_Interface(CH2Filterout,&globalHeartRate); // calculate

    }else{
      // Uncomment for CH1
      CH1Filterout = 0;
      // Uncomment for CH2
      //CH2Filterout = 0;
    }
    //To see the output of another channel on the plotter, change CH1Filterout to CHXFilterout, uncomment the specific channel number lines, and comment out the CH2 lines.
    Serial.println(CH1Filterout);
  }
}
Connect your arduino to computer and select your Arduino Board
Then Verify and Upload the Sample code
After uploading the code, go to Tools > Serial Plotter and then you can see module output
Make sure to set the BaudRate to 57600; otherwise, you will not receive correct data.
Below, you can download the ADS1191 library, schematic, and module datasheet.
Program output Images
Output Ch1 ECG Photo:
NOTE: The cleanliness of the ECG output signal depends on various environmental factors such as electromagnetic interference, power line noise, patient movements, electrode conditions, and skin impedance variations. These factors can contaminate the ECG signal and reduce the accuracy of its analysis.
To improve the quality of the output signal, it is necessary to reduce both environmental and biological noise. Some effective strategies include:
- Reducing electromagnetic interference: Using shielded cables, noise suppression filters, and maintaining distance from high-power electronic equipment.
- Eliminating power line noise: Applying a Notch filter at 50/60Hz.
- Reducing motion artifacts: Properly securing electrodes on the skin and using Adaptive Filters for signal processing.
- Pre-processing the signal: Applying Bandpass Filters (typically 0.5Hz to 100Hz) and using signal processing techniques such as Wavelet Transform or PCA/ICA to separate noise from the main signal.
Finally, optimizing the recording conditions and using appropriate signal processing algorithms play a crucial role in achieving a high-quality and reliable ECG signal.